
Featured Image: Paradise by Rubén Álvarez
Color is the language of art. Mastering color management will enable you to bring your artwork to life on any digital device and any medium: predictably and accurately.
The basics of color management
The color gamut supported by a device which presents visual information can be described using a color profile. Color profiles can help to approximate the capabilities of one display using another in order to improve color accuracy throughout the creative process. When you use color management correctly, you can see what future end users will see, while polishing your design. Looking at your artwork from the vantage point of its future audience is the key to success.
About color profiles
Color profiles tell an application how to use the address space of a color system (typically RGB) with respect to the color space that is used by a document (RGB, CMYK, Lab, etc.) under the constraints imposed by the color characteristics of the equipment/medium that is available. These color characteristics are usually referred to as the color gamut of a device: the entire range of colors that a particular device such as a display or a medium such as paper allows you to visualize.
Different color profiles describe different color spaces. You can explore the contents of an ICC profile using a utility such as the ICC Profile Inspector (PC only), the ColorSync app on OS X (pre-installed in /Applications/Utilities last time we checked) or Gamutvision.
A color profile can be embedded within an image file (this is an option when saving an image file in Photoshop, for example). By embedding a profile in a file you ensure that that profile becomes available to any application that opens the document (that application must be capable of interpreting the color profile; that’s why deactivating color management in Photoshop is such a bad idea).
A color profile can also be saved in a file and installed within an application so that it becomes available when handling images. Yes, that’s right: you can extend the color management capabilities of Adobe Photoshop by installing additional color profiles on your system.
How computers and other devices use color profiles
An operating system such as Windows or OS X has its own engine for handling color profiles that may enhance the color capabilities of displays in the color space each of them uses. Unless you are using custom color calibration software for your custom calibrated display, this is usually not your concern.)
In any case, you need to make sure that the color settings of your creative applications–Photoshop, InDesign, Illustrator, etc.–are appropriate for your workflow, as they can make or break any creative project.
You also need to understand the implications of your color management decisions so that you can avoid making costly mistakes.
The importance of using correct color profiles
An image may be confined to a color profile that is totally inappropriate for its color characteristics. This will result in substandard quality. Sometimes, you can reverse the damage and enhance the visual appearance in a meaningful manner by replacing the inappropriately assigned color profile.
If the image has been converted between two color spaces using an inappropriate color profile at some prior step in the workflow, information may have been irreversibly lost. For this very reason, it is of paramount importance to correctly handle color information throughout the entire workflow.
How to set up color management in Adobe Creative Cloud applications
Follow these steps to ensure that Adobe Creative Cloud applications on your system are configured correctly.
Step 1. Synchronize Color Settings in Adobe Bridge
Start Adobe Bridge and use the command “Edit > Color Settings…” to open a dialog with color management presets currently available on your system. Select one for your workflow and hit Apply to synchronize it across all CC applications on your system. (If you cannot see a setting appropriate for your workflow, continue with Step 3 below.)
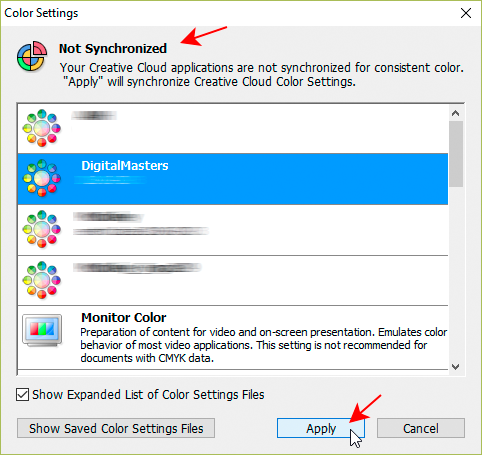
Step 2. Confirm that color management settings have synchronized correctly
Open Photoshop, InDesign or another CC application and navigate to “Edit > Color settings…”. In the dialog that opens, you should see a confirmation that Bridge has synchronized color management settings with Photoshop. If this is the case, there is no need to check the other applications.
If you would like to create a custom setting, continue with the steps below; otherwise you are done.
How to create custom color management settings for your workflow
If your workflow requires custom settings, there are a few more steps you need to take to ensure that your applications produce predictable results.
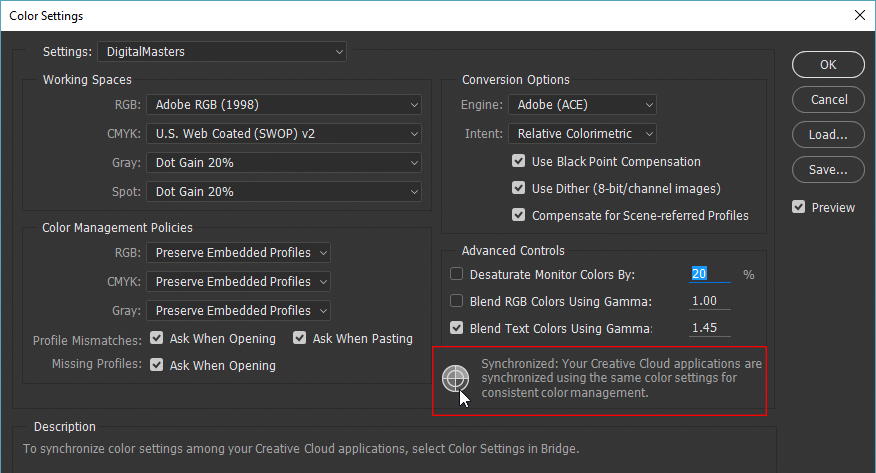
Step 3. Create custom color management settings
Open color management settings in Photoshop (menu “Edit > Color settings…”). In the following dialog, select your custom color profiles, set color management policies, and adjust other options. When you are done, click on Save and enter a note. The note will appear in the Description section of the Color Settings dialog.
In the file select box, rename the settings file without changing its file extension or the path. Confirm. The file name will become the name of the preset. Confirm again to save the file in its default location.

After saving the custom settings file close Photoshop, open Bridge and repeat Step 1 above. Bridge should synchronize your settings across all Adobe applications.
How to handle color profile mismatches
By activating the “Ask When Opening” option for Missing Profiles in the Color Settings dialog in Photoshop, you request a warning whenever you open an image that has no color profile associated with it. Why is this important? An image without a color profile will not be displayed accurately and you may end up introducing color corrections that will make things worse instead of better.
How to handle a document which has no color profile embedded into it
When you see a Missing Profile warning, Photoshop will offer you one of three options to handle the situation:
- “Leave as is (don’t color manage)”: This option is best when you aren’t yet sure which profile you should assign to the image; in this case, it is best to try out different profiles with the preview option on, so that you see what you are doing
- “Assign working RGB: [your working RGB]”: this option is appropriate if you happen to be using the color profile of the device which has originally created this image as your working color space (such as Adobe RGB 1998);
- “Assign profile: [menu with all profiles installed in Photoshop], and then convert document to working RGB”: this option is most appropriate when opening an image, whose originating color profile is known to you, but differs from your working RGB profile.
Whenever in doubt, select the first or second option, then use the command “Edit > Assign Profile…” to perform this action with a preview. Do NOT perform color conversions in the blind; this could result in a permanent quality loss.

How to handle a document which has the wrong profile embedded in it
When you try to open a document with a color profile that does not match your working profile for that particular color space (RGB or CMYK) and you have activated the “Ask when Opening” option for profile mismatches, you will see a warning that offers you the following options:
- “Use the embedded profile (instead of the working space): select this option if you happen to know that the image has the correct color profile assigned to it;
- “Convert document’s colors to the working space”: never use this option, it shouldn’t even be here (a color conversion can result in a permanent quality loss< the only exception to the rule: if you are sure that the originating color profile matches the device and the destination profile matches your workflow);
- “Discard the embedded profile (don’t color manage): select this option when you don’t know which device the file originates from and you need a preview to decide which profile to assign to the image; after selecting this option use the command “Edit > Assign Profile…” (do not work with a deactivated color management);

When in doubt, always perform profile assignments and color conversions using a preview (look for the appropriate command in the menu “Edit”).
Leave a Reply